 Reprinted Courtesy of DVR Playground
Lightrunner came up with a better alternative to the “onion paper” hood as it just wasn’t aesthetically pleasing.
I figured the IR sensor had to be right behind the face plate as with most A/V components, so I decided to take my S3 apart and see if I could shield it somehow without completely blocking it. Taking apart the S3 was very easy and the inside was very easy to work in.
Removing the face plate was simple requiring unscrewing only two screws at each of the upper corners, unplugging the white ribbon cable from the main board, pushing back the three clips at the top holding the face plate to the main chassis and then the face plate is off.
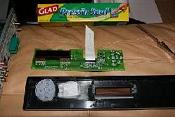
There are eight screws holding a green circuitry board on the back of the face plate. Once the board is removed you will see the IR sensor on the other side of the circuitry board. It looks like a small black bulb that sits on a stand. You will also see a small square hole on the back of the face plate where the IR sensor extends into. I had to improvise since I could not use a piece of paper to sit flush across the hole which would block the IR sensor from extending through it. So I used GLAD Press and Seal by taking six 1.5 inch x 2 inch strips and covering the hole and creating a little dimple for the IR sensor. I put everything back to together and turned the S3 back on and viola it works perfectly and you CAN’T EVEN SEE IT. You might have to use more strips depending on how bright your plasma is or how much interference it produces. You could also use strips of those plastic grocery bags as long as they are not clear but I didn’t want to deal with tape. Here are the quick steps.
- Unscrew the torque screws from the back of the TiVo S3 then remove the black cover of the S3.
- Unplug the white ribbon cable connecting the Face Plate to the main board. REMOVE FROM THE MAIN BOARD it just pulls right out of the connector. Just make sure you are pulling on it gently.
- Unscrew the two torque silver screws at the top of each right and left corners that fastens the face plate to the main chassis.
- Gently lift up on the three black clips on top of the S3 holding the face plate to the main chassis. You will need to feel around for it but there’s one in the center and two towards the left of the S3 if you are facing it. Just run your fingers along the top lip of the opening and you will feel it.
- Gently pull apart the Face Plate while threading the white ribbon cable back through the slit on the chassis. Then unscrew the eight silver screws holding the circuitry board to the back of the Face Plate. Then GENTLY lift up on the green circuitry board. There are loose items underneath. They are easy to put back but just incase you don’t want the hassle of searching and retrieving them off the floor.
- Find the small square hole on the left close to where the input buttons are. Take 6 to 8 (depending on your plasma) 1.5 inches x 2.0 inches of GLAD Press and Seal fix them across the hole making sure to create a small dimple in the hole for the IR Sensor. I just pushed my pinky finger where the small hole was to create the dimple.
- Gently place the green circuitry board back and screw it down to the back of the Face Plate.
- Thread the white ribbon cable back through the small slit in the front of the main chassis and reattach the Face Plate to the main chassis. Clip the bottom of the Face Plate to the chassis first and the rest will snap right in with a firm push.
- Screw the two torque screws back on for the Face plate then Insert the blue end of the white ribbon cable back in the black connector on the main board.
- Screw the black hood back on.
Now you are ready to connect your S3 back to your plasma or LCD and test the remote.
TiVo could have a quick fix buy retrofitting a plastic hood that fits into the IR sensor hole or they could even send out the retrofit for self install.
Here are some pictures of what I did.