Reposted courtesy of lightrunner and DVR Playground.
 Lightrunner, a TiVo modder, was kind enough to send us his instruction cookbook on how to modify a TiVo Series3 to a 1TB RAID setup. Scrapping his warranty paperwork, lightrunner used an external RAID setup to increase the storage capacity of his S3 to over 130 hours of HD programming and over 1240 hours (or 52 days) of standard definition television!
Things you will need:
* Torx Screw Driver
* eSata Raid Enclosure
* At least 3 Western Digital RE2 500GB Hard Drives
* MFS Tools 2.0
First decide on an eSATA enclosure with a controller card built in and the flexibility of multiple RAID levels especially RAID 5 for fault tolerance.
I chose the SANS Digital which meets all the required specs but also includes several extra features such as Hotspare, USB 2, Firewire 400/800 and NCQ. I also chose to use Western Digital RE2 drives after reading this review.
Make sure the SATA to eSATA cable is long enough so that it gives placement options for the eSata RAID enclosure.
Install the new SATA drives into the eSata RAID enclosure and create a RAID-5 set with three 500GB hard drives then create a volume set across those three 500GB hard drives with 64 Kbyte block size. This will take time so continue on with the next steps.
If the TiVo has not been setup already, go ahead and complete the guided setup to confirm that the original image from TiVo is operational.
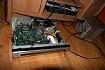
Once the guided setup is complete unplug all the cables from the TiVo and remove the cover by unscrewing the eight torx screws in the back of the TiVo S3.
Next, unplug the 22 pin data and power SATA cable from the factory SATA Hard Drive. Also, unplug the SATA cable from the main board as well making sure to secure the now loose SATA cable so that it does not touch the main board.
Now remove the hard drive by unscrewing the four torx screws and carefully lifting the drive tray straight up and out of the chassis. Once the drive tray is removed, detach the factory SATA drive from the tray by unscrewing the four torx screws underneath the drive tray.
Plug the SATA drive into a SATA port in a linux box with SATA support with at least 2 SATA ports open.
I usually use Silicon Image controllers because of the cross platform support.
Verify that the volume set has been created on the eSATA RAID enclosure. Plug the eSata end of the SATA to the eSata port of the eSATA enclosure then plug the SATA end into an internal SATA port in the linux box.
Power up the linux box and verify that the drives and volumes are viewable by the BIOS. You can enter the BIOS or SETUP to view this.
Once linux is booted up open up a terminal window and type in this command: cat /proc/partitions
Verify which drive (sdc?) is the original TiVo drive. You will be able to tell by the size of the drive which should be around 250GB. The eSATA RAID enclosure will be around 1TB. Confirm its drive as well (sdd?).
Now open up an internet browser and download the statically linked MFStools gzipped.tar file. Extract the gzipped.tar file either to your desktop or to a folder where you will remember the path easily.
I just extracted the files to a folder I created: /mfstools.
Now, you must perform the upgrade to the eSata RAID enclosure by typing the following command:
/mfstools/mfstool backup –f 9999 –o – /dev/sdc | /mfstools/mfstool restore –s 127 –r 4 –xzpi – /dev/sdd
* the sdc and sdd are variable to your drive setup. Yours could be sdb and sdc verify this with the cat /proc/partitions command.
This will automatically start scanning the source drive and start an uncompressed backup and restore. This is a very short process which should last only a few minutes at most. Once completed, you will see the new estimated standalone size. You will not need to expand the drive any further since we already placed that command during the mfsbackup and restore command line (-x ). You can read the README file in the mfstools extracted folder for the command switches.
Run an mfstools info command on the new eSata RAID enclosure to verify the mfs partitions as well as the expanded partitions. You should see six partitions ranging from /dev/sdd10 though /dev/sdd15. (sdd10, sdd11, sdd12, sdd13, sdd14 and sdd15) sdd14 and sdd15 are the expanded partitions. Type the following: /mfstools/mfstool mfsinfo /dev/sdd
Once you have verified all the partitions, turn off the eSata RAID enclosure. Unplug the power and eSata cable and take it over to your TiVo. Take the SATA to eSata cable and plug in the SATA end into the TiVo’s internal SATA port. Plug the eSata end into the eSata RAID enclosure. Power on the eSata enclosure and wait till all drives are initialized. Once the eSata RAID enclosure is up and running and the drives have been initialized, turn on your TiVo. You should run a Clear and Delete Everything (if you don’t want to keep any programs) and Repeat the Guided Setup or you can just run the Repeat Guided Setup.